


Comics Are a Prompting Problem
A single great character illustration is easy. A six-panel page where the same character is recognizable in every panel — same face, same jacket, same art style — is hard, because every generation is a fresh roll of the dice. Modern image models (Ideogram 4.x, Nano Banana 2.1, FLUX 3) handle legible in-panel text and multi-character scenes far better than 2024-era models, but continuity across panels still has to be engineered. The comics workflow below is that engineering.
Step 1: The Character Bible — Lock the Look Before Panel One
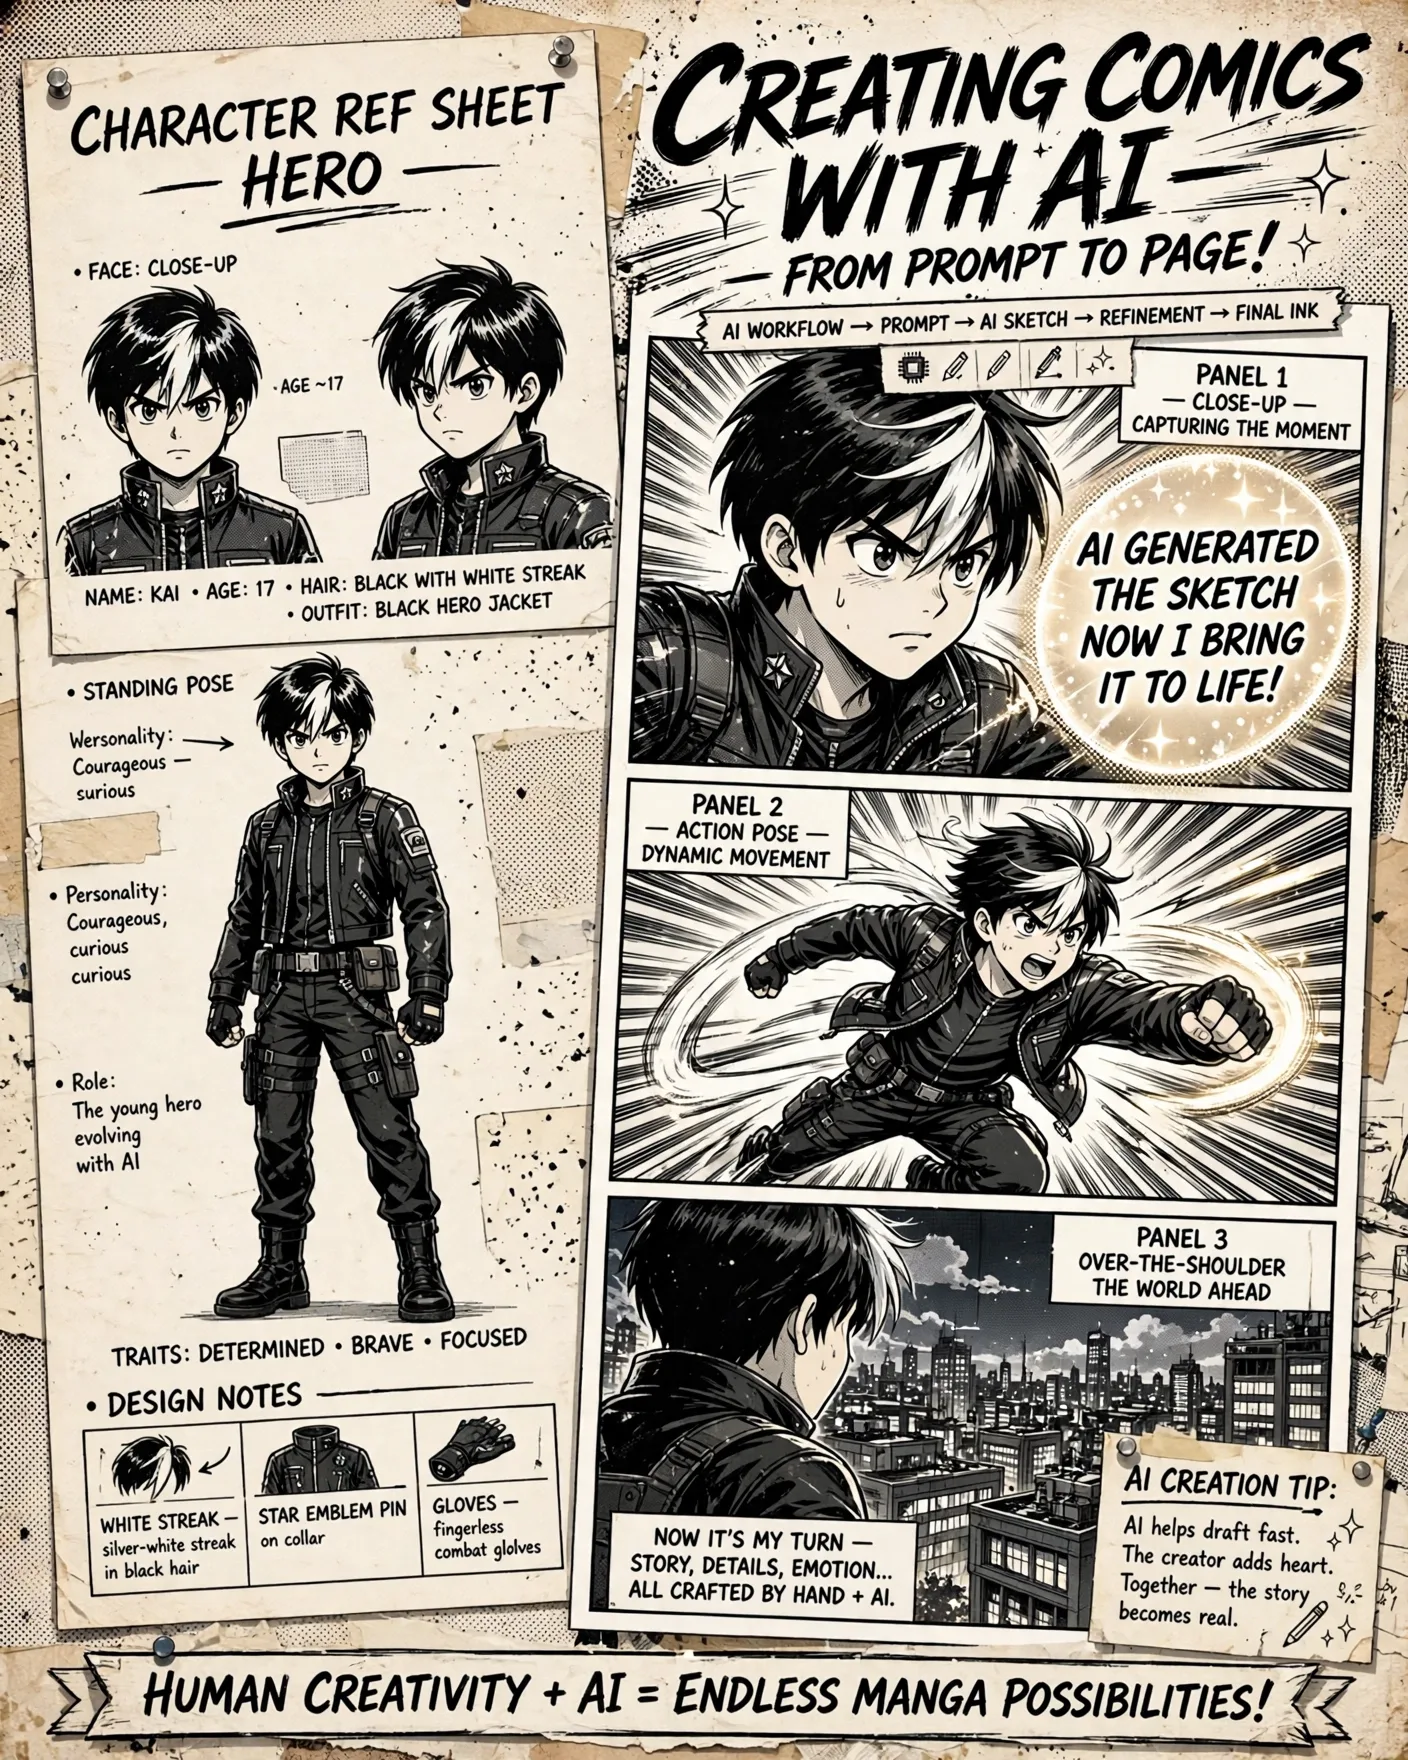
Before prompting a single panel, build a character bible: a locked description of every visual trait that must not change — age, face shape, hairstyle and color, eye color, signature outfit down to the jacket and boots, art style, line weight, color palette. Generate a reference sheet first (front view, three-quarter view, expression set) and use it as the reference image for every panel. Reference-image consistency — the same technique behind Vidu Q4's and Seedance 2.5's character locking — is the current standard: feed the bible sheet into each panel generation so the model has the answer instead of improvising it.
CHARACTER BIBLE: Kaito, 17, lean build, messy black hair with a white streak over the left eye, sharp gray eyes, long scar across the right cheek. Signature outfit: oversized indigo hoodie, black cargo pants, red sneakers, brass knuckle-duster ring on left hand. STYLE: shonen manga, bold ink lines, screentone shading, high-contrast action rendering. This description is LOCKED — reproduce exactly in every panel.
Step 2: Panel Vocabulary — Speak in Shots
Describe panels the way a comics artist thumbnails them: shot type, angle, and action in one tight sentence. Establishing shot, close-up, over-the-shoulder, low-angle hero shot, dutch tilt — this vocabulary exists precisely so you can be exact. Add panel position on the page (top-left, full-bleed splash) and the emotional beat it carries, and the model stops guessing your layout.
- Establishing shot: wide view that sets the location
- Close-up: face or object detail for emotional weight
- Over-the-shoulder: dialogue and confrontation
- Low-angle hero shot: power and scale
- Dutch tilt: unease and chaos
- Splash page: one full-page image for the money moment
Step 3: The Single-Panel Prompt Template
Build every panel from the same template: locked style, character bible reference, shot description, action, dialogue with bubble placement, and text rendering instructions. One panel, one action — panels that try to do two things blur into neither.
STYLE: [paste locked style from bible]. CHARACTER: [paste bible or attach reference sheet]. PANEL: low-angle hero shot, Kaito landing in a crouch on the rooftop, coat flaring, debris flying upward. DIALOGUE: speech bubble top-right, text "You picked the wrong roof." TEXT: render dialogue in clean comic lettering, all caps. MOOD: triumphant, high contrast.
Step 4: Keeping a Cast Consistent Across 6–12 Panels
Continuity is a workflow, not a wish. Generate panels in story order and feed the previous panel (or the bible sheet) as a reference into the next. Keep the style block byte-identical across all prompts — even small wording changes drift the rendering. For a full cast, give each character their own bible and reference sheet; in group panels, name every visible character and their position. When a face drifts anyway, regenerate that single panel with a tighter reference crop rather than accepting the drift and compensating later.
Dialogue Bubbles and SFX: Render vs Add Later
Current models render short dialogue legibly in-image — keep bubble text under ~8 words, all caps, clean lettering. Long monologues still belong in post-production: generate the panel clean and add text in an editor, where you control fonts and placement. Sound effects (KRAKOOM, slice, whisper) render well as stylized in-image text and are worth generating directly — they are part of the art. Rule of thumb: if the text IS the art, generate it; if the text sits ON the art, add it later.
Style Presets: Four Starting Points
Swap the style block to change genres instantly. Shonen manga: bold ink, screentones, speed lines, explosive action. Noir graphic novel: heavy blacks, rain, venetian-blind shadows, muted palette. Western superhero: clean lines, dynamic anatomy, saturated colors. Chibi: oversized heads, simplified features, pastel palette, comedic timing. The bible method works identically under every preset — only the style block changes.
Frequently Asked Questions
How do I stop the character's face changing between panels?
Use a locked character bible plus a reference sheet fed into every panel, keep the style block byte-identical, generate panels in story order with the previous panel as reference, and regenerate single drifted panels with tighter reference crops.
Can AI image models render readable comic dialogue?
Yes for short text — keep in-image dialogue under about 8 words in clean all-caps lettering. Short speeches and narration boxes are still better added in an editor after generation.
How many panels should I generate at once?
One at a time. Multi-panel single generations lose continuity control and layout precision. Generate panels individually with the shared bible, then assemble the page.
What's the best model for comic panels right now?
Models with strong text rendering and reference-image support lead: Ideogram 4.x for legible in-panel text, Nano Banana 2.1 for mask-guided edits, FLUX 3 for style fidelity. Test your bible on two models before committing to a full chapter.
Related Prompts
Rembrandt Noir Men's Portrait Prompt — Diagonal Light Beam (4:5)
ChatGPT
Surreal Universal Ad Template Prompt — Any Product, One Twist (4:5)
ChatGPT
Epic Automotive Collector Poster Prompt — Hero Car Key Art (4:5)
ChatGPT